


When you have a little one on the way, there are so many benefits to keeping your body moving if you feel up to it, but navigating all of the changes your body is going through and the abundance of information out there can make it downright confusing to even know where to begin.
It’s my goal to help women feel confident to train during pregnancy and beyond, based on years of personal training experience and embracing feel-good movement during my own two pregnancies.
This workout aims to support the changes your body is going through, preparing you and your body for the remainder of your pregnancy and to help you to feel your best. If you’re expecting (or hope to be soon!), here are my top tips for each trimester.
Top tips for exercising while pregnant
First trimester
Listen to your body and just focus on moving when you feel up to it, as many women tend to find this is a time when they lack energy and feel nauseous. During this time I encourage my clients to focus on the small wins like going for a short walk, a 10-minute stretch or opting for a light session until you reach your second trimester. Whether you’re walking or still doing light workouts, remember to keep yourself hydrated and maintain a stable heart rate so as to not exert yourself too much.
RELATED: 10–minute Pilates pregnancy workout to lengthen and strengthen
Second trimester
As women, trimester two is generally when we have the most energy. We have passed the weeks in the early stages where we should be cautious and the nausea has usually passed. Focus on following a pregnancy-specific program to support all the changes your body goes through and enjoy feeling strong and staying active if you feel up to it. If you’re strength training, you can also widen your squat and deadlift stance to account for the changes and downward pressure on the pelvis.
Third trimester
We have hit the peak of the mountain and now we start to taper back on the load we are lifting. Keep up the walking, just lighten the weights a little bit. If you’re still feeling good working out, you can also start squatting to a bench to assist with the extra downward pressure on your pelvis. For any unstable exercises, use a wall to support you and your balance.
An express 20-minute full-body workout for the first trimester
90/90 Hip Rotation: 10-20 sec
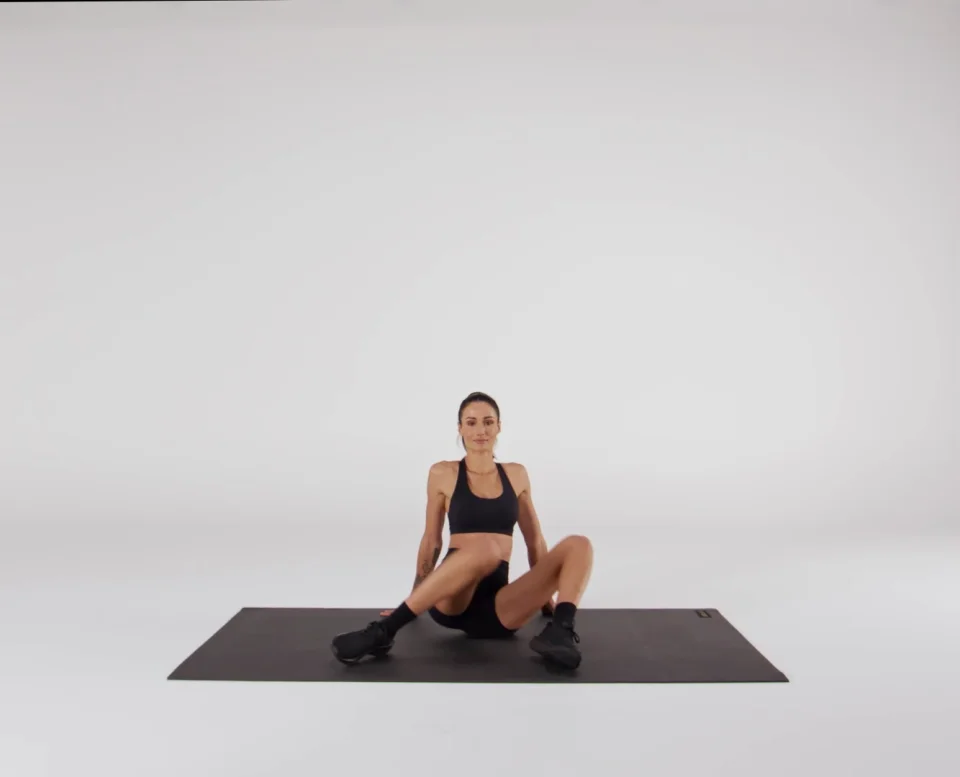
- Sit on the floor with one leg bent in front of your body and the other bent behind your body with both your hips and knees at a 90-degree angle. Your torso should be upright with your hands resting behind you for support. This is your starting position.
- While keeping your feet on the floor, maintain a neutral spine and control of your core as you lift both knees off the ground at the same time and swivel your hips so that your knees move to the opposite side of your body. Allow your hips to relax as you move through your full range of motion. You should aim to keep your glutes in contact with the ground throughout this movement.
- Continue alternating between sides.
Butterfly Hip Stretch: 10-20 sec
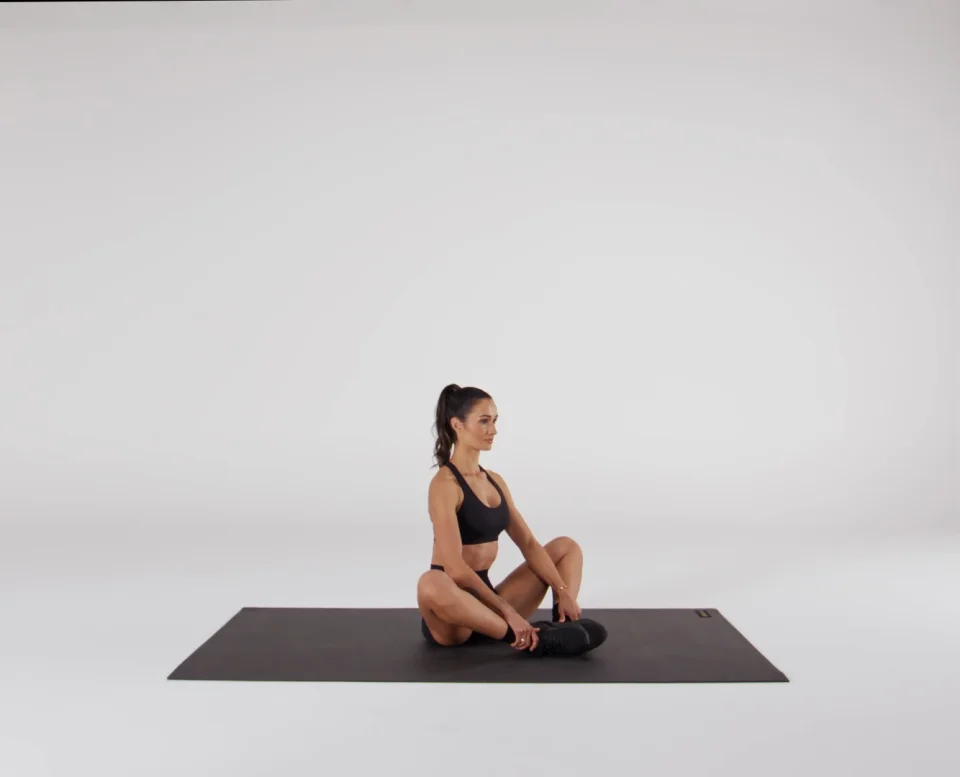
- While seated on a yoga mat, extend both legs out in front of you. Release and turn out both legs to bring the soles of your feet together directly in front of you, Place your hands on your feet, resting your forearms on your thighs.
- Bending from the hips, lower your torso towards the mat and gently use your forearms to press your thighs towards the mat.
- Hold this position, breathing deeply throughout. Each time that you exhale, lower your torso further towards the floor and use your forearms to press your thighs further towards the mat.
Tricep Stretch: 10-20 sec

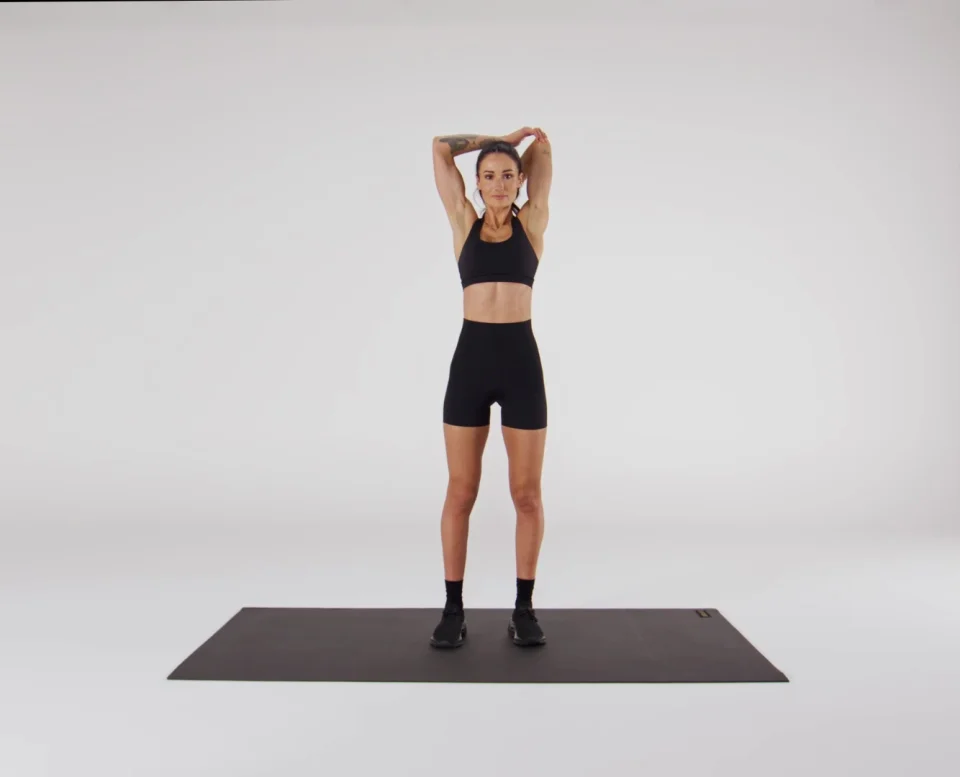
- Stand with your feet hip-width apart with your arms by your sides.
- Release your right arm overhead and place your hand between your shoulder blades.
- Gently push down your right elbow with your left hand and hold this position
- Repeat on the other side.
Bird Dogs: 2 sets of 10 reps
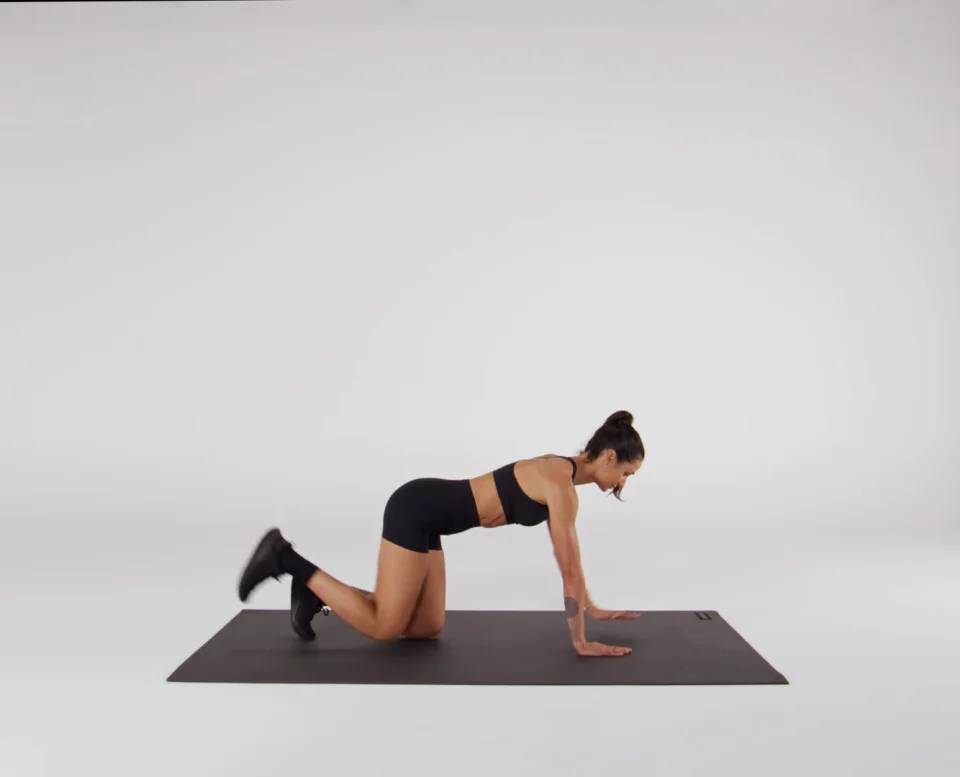
- Starting on all fours on a yoga mat, ensure that your knees are below your hips and your hands are below your shoulders. Set your spine in a neutral position and draw your shoulder blades down and back. This is your starting position.
- Gently draw your ribs to your hips to engage your core. Release and elevate your right arm and left leg until they are in line with your spine, ensuring that your shoulders and hips remain parallel to (in line with) the floor.
- Lower your right arm and left leg to return to the starting position.
- Release and elevate your left arm and right leg until they are in line with your spine, ensuring that your shoulders and hips remain parallel to (in line with) the floor.
- Lower your left arm and right leg to return to the starting position.
- Continue alternating between sides.
Supermans: 2 sets of 10 reps
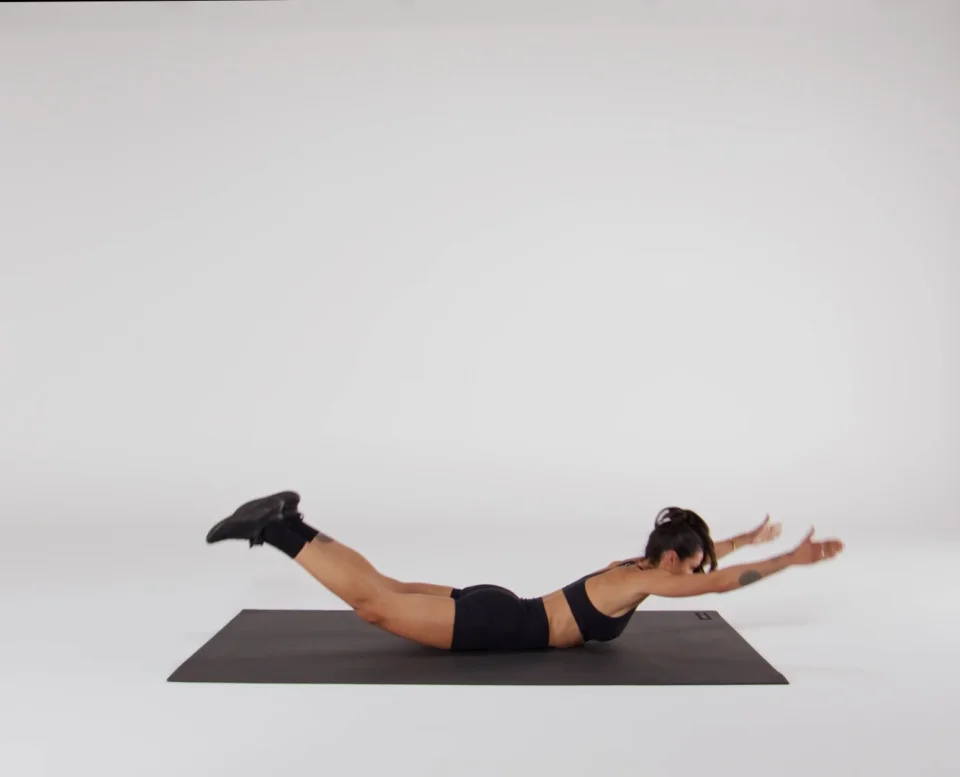
- Lying on your front with your arms and legs fully extended, lift your arms, chest, and legs off the floor simultaneously, squeezing your lower back and glutes while keeping your head down. Do not lift too high; avoid straining your lower back or neck. You should feel the activation in your lower back and glutes as you lift and hold.
- Hold the lifted position briefly before slowly lowering back down to the floor.
- Repeat.
Downdog Calf Pedals: 2 sets of 10 reps
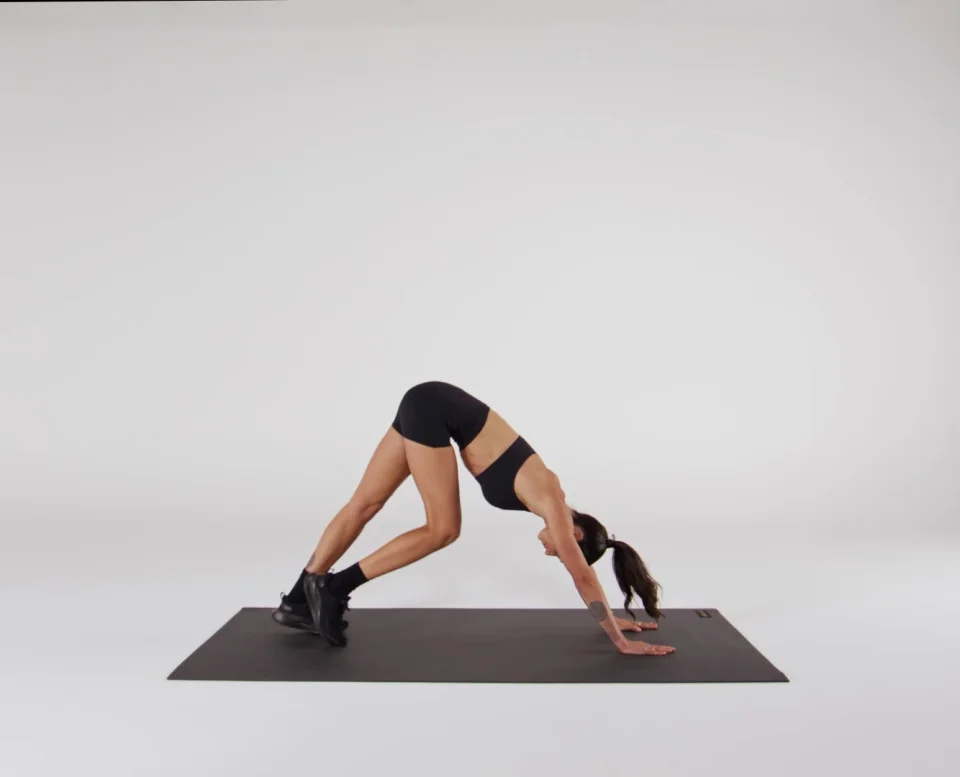
- Place both hands on the mat slightly further than shoulder-width apart, feet together on the mat behind you while resting on the balls of your feet in a push-up position. While maintaining a neutral spine and stabilising through your abdominals, elevate your hips to create an inverted ‘V-shape’. With knees slightly bent, press your heels into the mat and tilt your tailbone upwards. This is your starting position.
- Bend your left knee to elevate your heel slightly and press your right heel into the mat, stretching your right calf. Extend your left knee to return to the starting position.
- Bend your right knee to elevate your heel slightly and press your left heel into the mat, stretching your left calf.Extend your right knee to return to the starting position. Continue alternating between right and left, breathing throughout.
Main Workout (15-Minute Ladder):
- Structure: 7 laps
- Reps: 4, 6, 8, 10, 8, 6, 4 (i.e. 4 reps of each exercise in lap 1, 6 reps in lap 2, 8 reps in lap 3 and so on like a ladder, then decreasing in the second half)
- Rest: 20 seconds between each lap
Kneel to Get Up
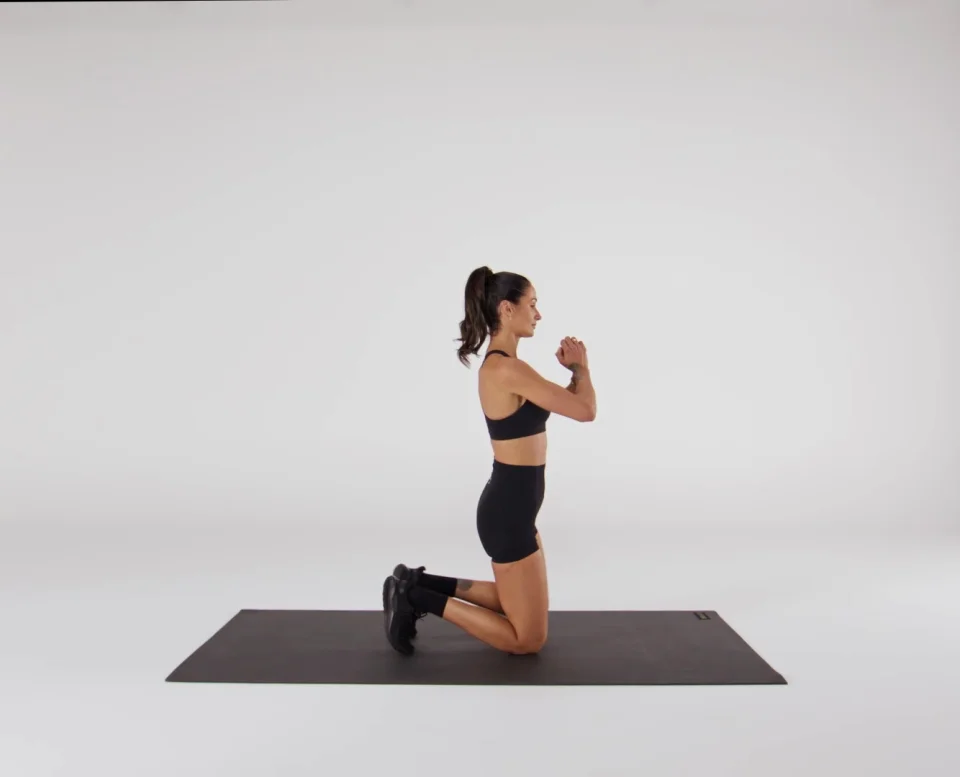
- Begin by standing with your feet hip-width apart.
- Bend your knees and lower yourself to a kneeling position on your mat, bringing one knee down at a time while keeping your posture upright.
- To stand up, shift your weight to your left knee, then place your right foot flat on the ground in front of you, creating a 90-degree angle with your knee and ankle.
- Push off the ground and use your right leg to help lift your body, bringing your left leg forward to a standing position.
- Repeat, alternating sides.
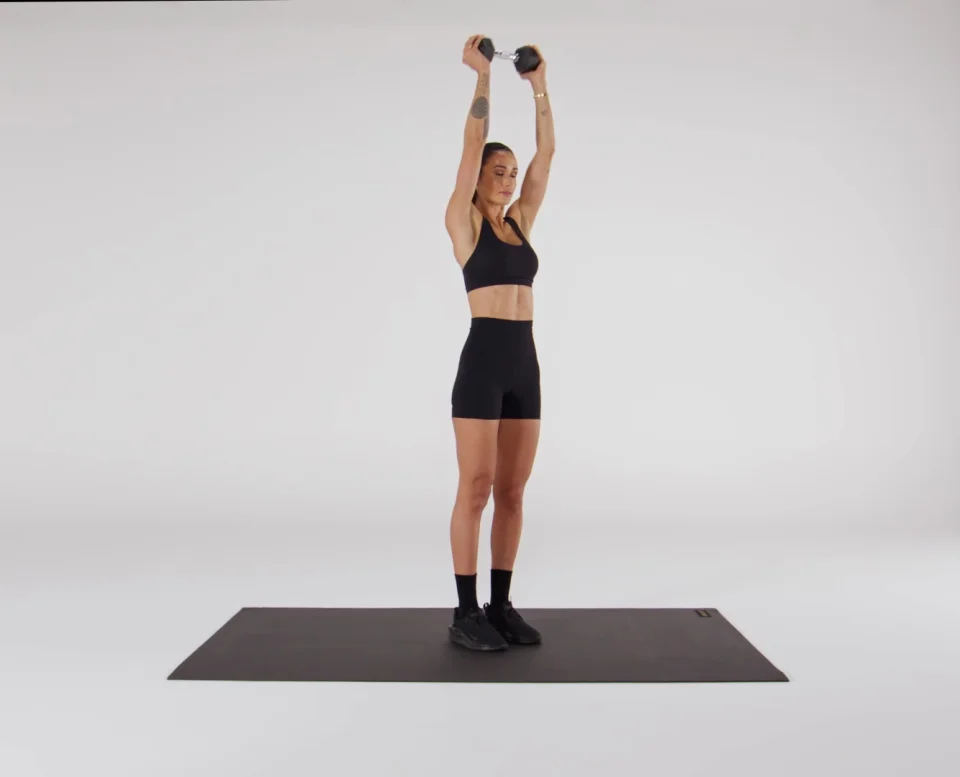
Halo
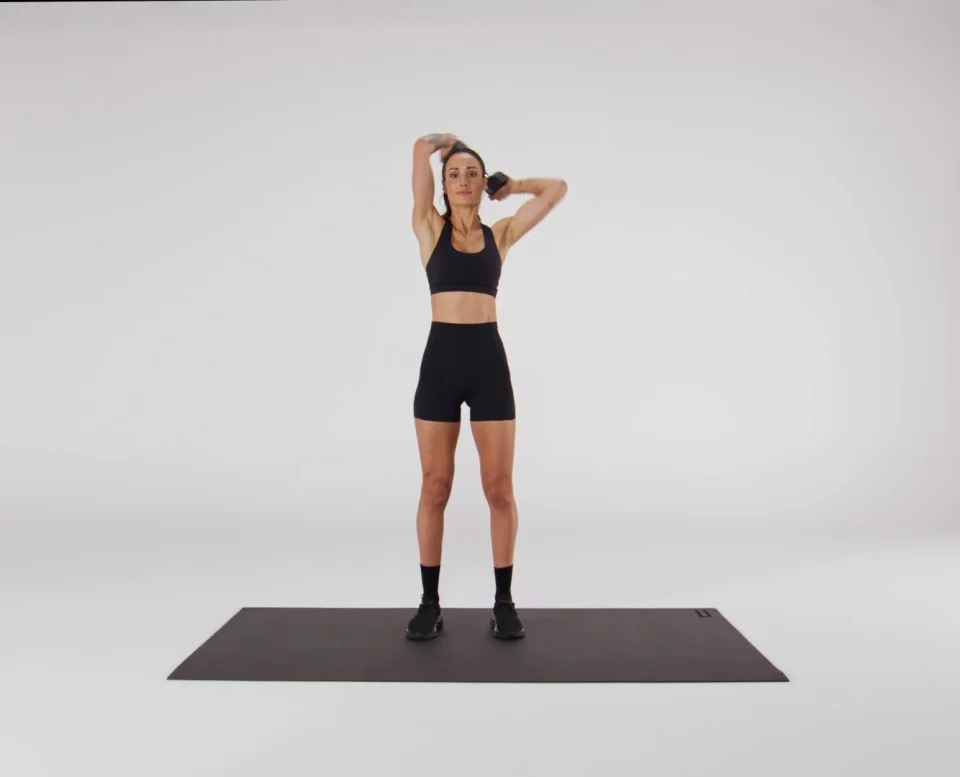
- Start by standing with feet hip width apart with one dumbbell held horizontally between your hands at chin height. Elbows should be bent by your sides. Gently draw the ribs down towards the ribcage to brace your core. This is your starting position.
- Raise the dumbbell towards your left ear then guide the dumbbell around the backside of your head until the dumbbell passes your right ear and comes back to the starting position. Keep your arms bent and close to your face while the dumbbell moves in a circular motion around your head.
- Pause briefly then repeat in the other direction. Continue alternating sides.
Sumo Squat to Upright Row
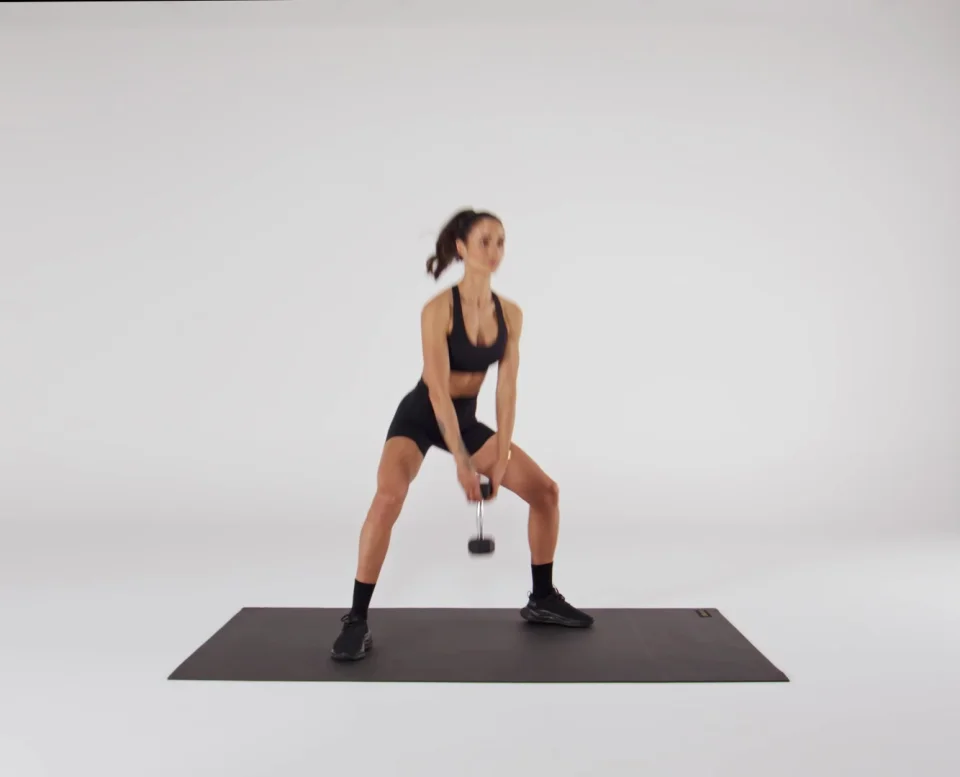
- Stand with your feet wider than shoulder-width apart, toes pointing slightly outward. Hold a dumbbell with both hands, letting the weight hang down in front of you.
- Keeping your core engaged and posture upright, bend your knees and lower your body into a squat position, pushing your hips back and keeping your knees aligned with your toes.
- As you begin to stand up from the squat, push through your heels and extend your legs while lifting the dumbbell straight up towards your chest. Keep your elbows higher than your wrists, bringing the dumbbell to about chest height.
- Squeeze your shoulder blades together at the top of the row.
- Lower the weights back down to the starting position with control, keeping your core engaged, before lowering back into the squat for your next rep.
Bear Hold Row

- Begin by getting into a bear hold position on all fours, holding a dumbbell in each hand with your palms facing each other. Have your hands slightly wider than shoulder-width apart and your knees directly under your hips.
- Lift your knees off the ground so that you are balancing on your dumbbells and toes, with your body in a straight line from your head to your heels. Engage your core and keep your hips level.
- While maintaining the bear hold position, row or pull one dumbbell up towards your rib cage, keeping your elbow close to your body and squeezing your shoulder blade at the top of the movement.
- Lower the dumbbell back to the starting position with control before repeating on the other side.
- Continue alternating sides, engaging your core to avoid rotating or rocking your hips.
Tricep Overhead Extension
- Holding a single dumbbell with both hands, stand with your feet shoulder-width apart. Extend your arms above your head, ensuring that they are on either side of your ears. This is your starting position.
- While keeping your shoulders as still as possible, bend your elbows to lower the dumbbell behind your head.
- Using your triceps, extend your elbows to return to the starting position, ensuring that your shoulders, elbows and wrists remain in line with one another at all times.
- Repeat.
Sarah Smith is Sweat’s dedicated pre and postnatal trainer and has been a personal trainer and coach since 2014. With two daughters of her own, she is passionate about guiding and empowering women to feel strong and active through all stages of pregnancy and beyond, and so much of her passion for fitness, health and longevity is motivated by her family. Her two pre and postnatal programs are available exclusively in the Sweat app.


